pd-tools-swagger2模块定位为文档组件,前后端开发人员可以查看接口文档,为前后端开发人员的开发统一接口,方便后续的前后端联调对接工作。
5.1 swagger介绍
相信无论是前端还是后端开发,都或多或少地被接口文档折磨过。前端经常抱怨后端给的接口文档与实际情况不一致。后端又觉得编写及维护接口文档会耗费不少精力,经常来不及更新。其实无论是前端调用后端,还是后端调用后端,都期望有一个好的接口文档。但是这个接口文档对于程序员来说,就跟注释一样,经常会抱怨别人写的代码没有写注释,然而自己写起代码起来,最讨厌的,也是写注释。所以仅仅只通过强制来规范大家是不够的,随着时间推移,版本迭代,接口文档往往很容易就跟不上代码了。
使用Swagger你只需要按照它的规范去定义接口及接口相关的信息。再通过Swagger衍生出来的一系列项目和工具,就可以做到生成各种格式的接口文档,生成多种语言的客户端和服务端的代码,以及在线接口调试页面等等。这样,如果按照新的开发模式,在开发新版本或者迭代版本的时候,只需要更新Swagger描述文件,就可以自动生成接口文档和客户端服务端代码,做到调用端代码、服务端代码以及接口文档的一致性。
为了简化swagger的使用,Spring框架对swagger进行了整合,建立了Spring-swagger项目,后面改成了现在的Springfox。通过在项目中引入Springfox,可以扫描相关的代码,生成描述文件,进而生成与代码一致的接口文档和客户端代码。
Springfox对应的maven坐标如下:
1
2
3
4
5
6
7
8
9
10
| <dependency>
<groupId>io.springfox</groupId>
<artifactId>springfox-swagger-ui</artifactId>
<version>2.9.2</version>
</dependency>
<dependency>
<groupId>io.springfox</groupId>
<artifactId>springfox-swagger2</artifactId>
<version>2.9.2</version>
</dependency>
|
5.2 swagger常用注解
| 注解 |
说明 |
| @Api |
用在请求的类上,例如Controller,表示对类的说明 |
| @ApiModel |
用在类上,通常是实体类,表示一个返回响应数据的信息 |
| @ApiModelProperty |
用在属性上,描述响应类的属性 |
| @ApiOperation |
用在请求的方法上,说明方法的用途、作用 |
| @ApiImplicitParams |
用在请求的方法上,表示一组参数说明 |
| @ApiImplicitParam |
用在@ApiImplicitParams注解中,指定一个请求参数的各个方面 |
5.3 swagger入门案例
第一步:创建maven工程swagger_demo并配置pom.xml文件
1
2
3
4
5
6
7
8
9
10
11
12
13
14
15
16
17
18
19
20
21
22
23
24
25
26
27
28
29
30
31
32
33
34
35
36
37
38
39
| <?xml version="1.0" encoding="UTF-8"?>
<project xmlns="http://maven.apache.org/POM/4.0.0" xmlns:xsi="http://www.w3.org/2001/XMLSchema-instance"
xsi:schemaLocation="http://maven.apache.org/POM/4.0.0 https://maven.apache.org/xsd/maven-4.0.0.xsd">
<modelVersion>4.0.0</modelVersion>
<parent>
<groupId>org.springframework.boot</groupId>
<artifactId>spring-boot-starter-parent</artifactId>
<version>2.2.2.RELEASE</version>
<relativePath/>
</parent>
<groupId>cn.itcast</groupId>
<artifactId>swagger_demo</artifactId>
<version>0.0.1-SNAPSHOT</version>
<name>swagger_demo</name>
<description>Demo project for Spring Boot</description>
<properties>
<java.version>1.8</java.version>
</properties>
<dependencies>
<dependency>
<groupId>org.springframework.boot</groupId>
<artifactId>spring-boot-starter-web</artifactId>
</dependency>
<dependency>
    <groupId>io.springfox</groupId>
    <artifactId>springfox-swagger-ui</artifactId>
    <version>2.9.2</version>
</dependency>
<dependency>
    <groupId>io.springfox</groupId>
    <artifactId>springfox-swagger2</artifactId>
    <version>2.9.2</version>
</dependency>
<dependency>
<groupId>org.projectlombok</groupId>
<artifactId>lombok</artifactId>
</dependency>
</dependencies>
</project>
|
第二步:创建application.yml文件
第三步: 创建实体类User和Menu
1
2
3
4
5
6
7
8
9
10
11
12
13
14
15
16
17
18
| package cn.itcast.entity;
import io.swagger.annotations.ApiModel;
import io.swagger.annotations.ApiModelProperty;
import lombok.Data;
@Data
@ApiModel(description = "用户实体")
public class User {
@ApiModelProperty(value = "主键")
private int id;
@ApiModelProperty(value = "姓名")
private String name;
@ApiModelProperty(value = "年龄")
private int age;
@ApiModelProperty(value = "地址")
private String address;
}
|
1
2
3
4
5
6
7
8
9
10
11
12
13
14
| package cn.itcast.entity;
import io.swagger.annotations.ApiModel;
import io.swagger.annotations.ApiModelProperty;
import lombok.Data;
@Data
@ApiModel(description = "菜单实体")
public class Menu {
@ApiModelProperty(value = "主键")
private int id;
@ApiModelProperty(value = "菜单名称")
private String name;
}
|
第四步:创建UserController和MenuController
1
2
3
4
5
6
7
8
9
10
11
12
13
14
15
16
17
18
19
20
21
22
23
24
25
26
27
28
29
30
31
32
33
34
35
36
37
38
39
40
41
42
43
44
45
46
47
48
49
50
51
52
53
54
55
56
57
58
59
| package cn.itcast.controller.user;
import cn.itcast.entity.User;
import io.swagger.annotations.Api;
import io.swagger.annotations.ApiImplicitParam;
import io.swagger.annotations.ApiImplicitParams;
import io.swagger.annotations.ApiOperation;
import org.springframework.web.bind.annotation.*;
import java.util.ArrayList;
import java.util.List;
@RestController
@RequestMapping("/user")
@Api(tags = "用户控制器")
public class UserController {
@GetMapping("/getUsers")
@ApiOperation(value = "查询所有用户", notes = "查询所有用户信息")
public List<User> getAllUsers(){
User user = new User();
user.setId(100);
user.setName("itcast");
user.setAge(20);
user.setAddress("bj");
List<User> list = new ArrayList<>();
list.add(user);
return list;
}
@PostMapping("/save")
@ApiOperation(value = "新增用户", notes = "新增用户信息")
public String save(@RequestBody User user){
return "OK";
}
@PutMapping("/update")
@ApiOperation(value = "修改用户", notes = "修改用户信息")
public String update(@RequestBody User user){
return "OK";
}
@DeleteMapping("/delete")
@ApiOperation(value = "删除用户", notes = "删除用户信息")
public String delete(int id){
return "OK";
}
@ApiImplicitParams({
@ApiImplicitParam(name = "pageNum", value = "页码",
required = true, type = "Integer"),
@ApiImplicitParam(name = "pageSize", value = "每页条数",
required = true, type = "Integer"),
})
@ApiOperation(value = "分页查询用户信息")
@GetMapping(value = "page/{pageNum}/{pageSize}")
public String findByPage(@PathVariable Integer pageNum,
@PathVariable Integer pageSize) {
return "OK";
}
}
|
1
2
3
4
5
6
7
8
9
10
11
12
13
14
15
16
17
18
19
20
21
22
23
24
25
26
27
28
29
30
31
32
33
34
35
36
37
38
39
40
41
42
43
44
45
46
47
48
49
50
51
52
53
54
55
56
57
| package cn.itcast.controller.menu;
import cn.itcast.entity.Menu;
import io.swagger.annotations.Api;
import io.swagger.annotations.ApiImplicitParam;
import io.swagger.annotations.ApiImplicitParams;
import io.swagger.annotations.ApiOperation;
import org.springframework.web.bind.annotation.*;
import java.util.ArrayList;
import java.util.List;
@RestController
@RequestMapping("/menu")
@Api(tags = "菜单控制器")
public class MenuController {
@GetMapping("/getMenus")
@ApiOperation(value = "查询所有菜单", notes = "查询所有菜单信息")
public List<Menu> getMenus(){
Menu menu = new Menu();
menu.setId(100);
menu.setName("itcast");
List<Menu> list = new ArrayList<>();
list.add(menu);
return list;
}
@PostMapping("/save")
@ApiOperation(value = "新增菜单", notes = "新增菜单信息")
public String save(@RequestBody Menu menu){
return "OK";
}
@PutMapping("/update")
@ApiOperation(value = "修改菜单", notes = "修改菜单信息")
public String update(@RequestBody Menu menu){
return "OK";
}
@DeleteMapping("/delete")
@ApiOperation(value = "删除菜单", notes = "删除菜单信息")
public String delete(int id){
return "OK";
}
@ApiImplicitParams({
@ApiImplicitParam(name = "pageNum", value = "页码",
required = true, type = "Integer"),
@ApiImplicitParam(name = "pageSize", value = "每页条数",
required = true, type = "Integer"),
})
@ApiOperation(value = "分页查询菜单信息")
@GetMapping(value = "page/{pageNum}/{pageSize}")
public String findByPage(@PathVariable Integer pageNum,
@PathVariable Integer pageSize) {
return "OK";
}
}
|
第五步:创建配置类SwaggerAutoConfiguration
1
2
3
4
5
6
7
8
9
10
11
12
13
14
15
16
17
18
19
20
21
22
23
24
25
26
27
28
29
30
31
32
33
34
35
36
37
38
39
40
41
42
43
44
45
46
47
48
49
50
51
| package cn.itcast.config;
import org.springframework.context.annotation.Bean;
import org.springframework.context.annotation.Configuration;
import springfox.documentation.builders.ApiInfoBuilder;
import springfox.documentation.builders.RequestHandlerSelectors;
import springfox.documentation.service.ApiInfo;
import springfox.documentation.service.Contact;
import springfox.documentation.spi.DocumentationType;
import springfox.documentation.spring.web.plugins.Docket;
import springfox.documentation.swagger2.annotations.EnableSwagger2;
@Configuration
@EnableSwagger2
public class SwaggerAutoConfiguration {
@Bean
public Docket createRestApi1() {
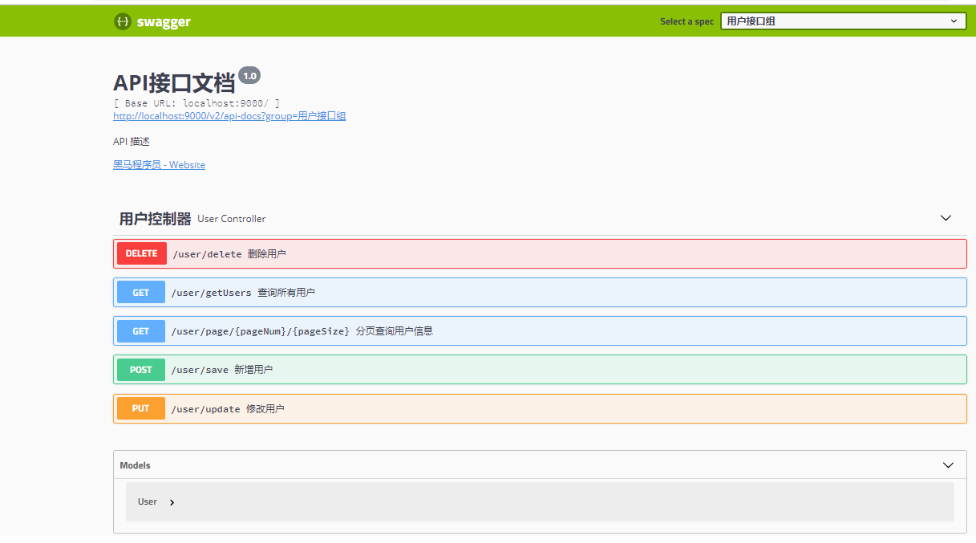
Docket docket = new Docket(DocumentationType.SWAGGER_2)
.apiInfo(apiInfo()).groupName("用户接口组")
.select()
.apis(RequestHandlerSelectors.basePackage("cn.itcast.controller.user"))
.build();
return docket;
}
@Bean
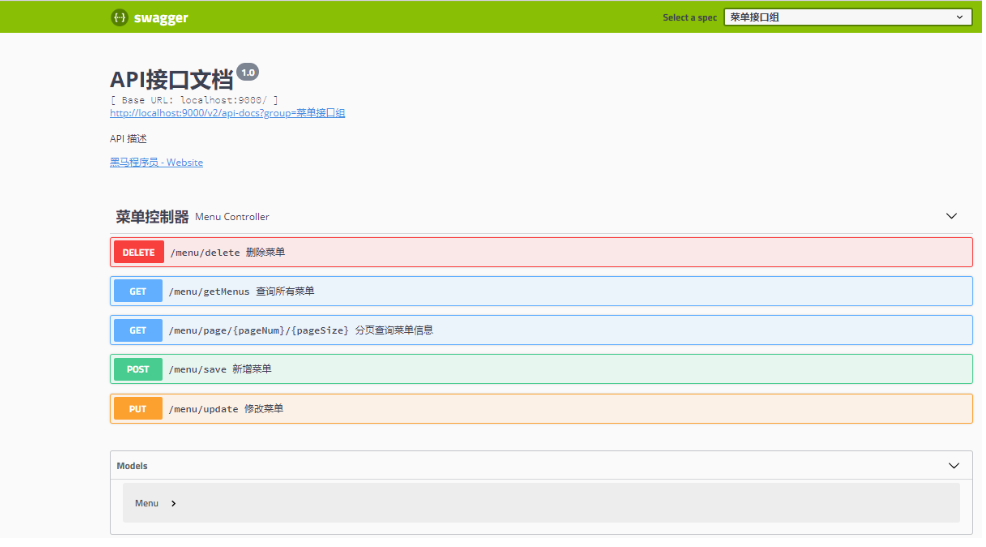
public Docket createRestApi2() {
Docket docket = new Docket(DocumentationType.SWAGGER_2)
.apiInfo(apiInfo()).groupName("菜单接口组")
.select()
.apis(RequestHandlerSelectors.basePackage("cn.itcast.controller.menu"))
.build();
return docket;
}
private ApiInfo apiInfo() {
return new ApiInfoBuilder()
.title("API接口文档")
.contact(new Contact("黑马程序员", "http://www.itheima.com", ""))
.version("1.0")
.description("API 描述")
.build();
}
}
|
第六步:创建启动类SwaggerDemoApplication
1
2
3
4
5
6
7
8
9
10
11
| package cn.itcast;
import org.springframework.boot.SpringApplication;
import org.springframework.boot.autoconfigure.SpringBootApplication;
@SpringBootApplication
public class SwaggerDemoApplication {
public static void main(String[] args) {
SpringApplication.run(SwaggerDemoApplication.class, args);
}
}
|
执行启动类main方法启动项目,访问地址:http://localhost:9000/swagger-ui.html
5.4 knife4j介绍
knife4j是为Java MVC框架集成Swagger生成Api文档的增强解决方案,前身是swagger-bootstrap-ui,取名knife4j是希望它能像一把匕首一样小巧,轻量,并且功能强悍!其底层是对Springfox的封装,使用方式也和Springfox一致,只是对接口文档UI进行了优化。
核心功能:
文档说明:根据Swagger的规范说明,详细列出接口文档的说明,包括接口地址、类型、请求示例、请求参数、响应示例、响应参数、响应码等信息,对该接口的使用情况一目了然。
在线调试:提供在线接口联调的强大功能,自动解析当前接口参数,同时包含表单验证,调用参数可返回接口响应内容、headers、响应时间、响应状态码等信息,帮助开发者在线调试。
5.5 knife4j入门案例
第一步:创建maven工程knife4j_demo并配置pom.xml文件
1
2
3
4
5
6
7
8
9
10
11
12
13
14
15
16
17
18
19
20
21
22
23
24
25
26
27
28
29
30
31
| <?xml version="1.0" encoding="UTF-8"?>
<project xmlns="http://maven.apache.org/POM/4.0.0"
xmlns:xsi="http://www.w3.org/2001/XMLSchema-instance"
xsi:schemaLocation="http://maven.apache.org/POM/4.0.0
http://maven.apache.org/xsd/maven-4.0.0.xsd">
<modelVersion>4.0.0</modelVersion>
<parent>
<groupId>org.springframework.boot</groupId>
<artifactId>spring-boot-starter-parent</artifactId>
<version>2.2.2.RELEASE</version>
<relativePath/>
</parent>
<groupId>cn.itcast</groupId>
<artifactId>knife4j_demo</artifactId>
<version>1.0-SNAPSHOT</version>
<dependencies>
<dependency>
<groupId>org.springframework.boot</groupId>
<artifactId>spring-boot-starter-web</artifactId>
</dependency>
<dependency>
<groupId>com.github.xiaoymin</groupId>
<artifactId>knife4j-spring-boot-starter</artifactId>
<version>2.0.1</version>
</dependency>
<dependency>
<groupId>org.projectlombok</groupId>
<artifactId>lombok</artifactId>
</dependency>
</dependencies>
</project>
|
第二步: 创建实体类User和Menu
1
2
3
4
5
6
7
8
9
10
11
12
13
14
15
16
17
18
| package cn.itcast.entity;
import io.swagger.annotations.ApiModel;
import io.swagger.annotations.ApiModelProperty;
import lombok.Data;
@Data
@ApiModel(description = "用户实体")
public class User {
@ApiModelProperty(value = "主键")
private int id;
@ApiModelProperty(value = "姓名")
private String name;
@ApiModelProperty(value = "年龄")
private int age;
@ApiModelProperty(value = "地址")
private String address;
}
|
1
2
3
4
5
6
7
8
9
10
11
12
13
14
| package cn.itcast.entity;
import io.swagger.annotations.ApiModel;
import io.swagger.annotations.ApiModelProperty;
import lombok.Data;
@Data
@ApiModel(description = "菜单实体")
public class Menu {
@ApiModelProperty(value = "主键")
private int id;
@ApiModelProperty(value = "菜单名称")
private String name;
}
|
第三步:创建UserController和MenuController
1
2
3
4
5
6
7
8
9
10
11
12
13
14
15
16
17
18
19
20
21
22
23
24
25
26
27
28
29
30
31
32
33
34
35
36
37
38
39
40
41
42
43
44
45
46
47
48
49
50
51
52
53
54
55
56
57
58
59
| package cn.itcast.controller.user;
import cn.itcast.entity.User;
import io.swagger.annotations.Api;
import io.swagger.annotations.ApiImplicitParam;
import io.swagger.annotations.ApiImplicitParams;
import io.swagger.annotations.ApiOperation;
import org.springframework.web.bind.annotation.*;
import java.util.ArrayList;
import java.util.List;
@RestController
@RequestMapping("/user")
@Api(tags = "用户控制器")
public class UserController {
@GetMapping("/getUsers")
@ApiOperation(value = "查询所有用户", notes = "查询所有用户信息")
public List<User> getAllUsers(){
User user = new User();
user.setId(100);
user.setName("itcast");
user.setAge(20);
user.setAddress("bj");
List<User> list = new ArrayList<>();
list.add(user);
return list;
}
@PostMapping("/save")
@ApiOperation(value = "新增用户", notes = "新增用户信息")
public String save(@RequestBody User user){
return "OK";
}
@PutMapping("/update")
@ApiOperation(value = "修改用户", notes = "修改用户信息")
public String update(@RequestBody User user){
return "OK";
}
@DeleteMapping("/delete")
@ApiOperation(value = "删除用户", notes = "删除用户信息")
public String delete(int id){
return "OK";
}
@ApiImplicitParams({
@ApiImplicitParam(name = "pageNum", value = "页码",
required = true, type = "Integer"),
@ApiImplicitParam(name = "pageSize", value = "每页条数",
required = true, type = "Integer"),
})
@ApiOperation(value = "分页查询用户信息")
@GetMapping(value = "page/{pageNum}/{pageSize}")
public String findByPage(@PathVariable Integer pageNum,
@PathVariable Integer pageSize) {
return "OK";
}
}
|
1
2
3
4
5
6
7
8
9
10
11
12
13
14
15
16
17
18
19
20
21
22
23
24
25
26
27
28
29
30
31
32
33
34
35
36
37
38
39
40
41
42
43
44
45
46
47
48
49
50
51
52
53
54
55
56
57
| package cn.itcast.controller.menu;
import cn.itcast.entity.Menu;
import io.swagger.annotations.Api;
import io.swagger.annotations.ApiImplicitParam;
import io.swagger.annotations.ApiImplicitParams;
import io.swagger.annotations.ApiOperation;
import org.springframework.web.bind.annotation.*;
import java.util.ArrayList;
import java.util.List;
@RestController
@RequestMapping("/menu")
@Api(tags = "菜单控制器")
public class MenuController {
@GetMapping("/getMenus")
@ApiOperation(value = "查询所有菜单", notes = "查询所有菜单信息")
public List<Menu> getMenus(){
Menu menu = new Menu();
menu.setId(100);
menu.setName("itcast");
List<Menu> list = new ArrayList<>();
list.add(menu);
return list;
}
@PostMapping("/save")
@ApiOperation(value = "新增菜单", notes = "新增菜单信息")
public String save(@RequestBody Menu menu){
return "OK";
}
@PutMapping("/update")
@ApiOperation(value = "修改菜单", notes = "修改菜单信息")
public String update(@RequestBody Menu menu){
return "OK";
}
@DeleteMapping("/delete")
@ApiOperation(value = "删除菜单", notes = "删除菜单信息")
public String delete(int id){
return "OK";
}
@ApiImplicitParams({
@ApiImplicitParam(name = "pageNum", value = "页码",
required = true, type = "Integer"),
@ApiImplicitParam(name = "pageSize", value = "每页条数",
required = true, type = "Integer"),
})
@ApiOperation(value = "分页查询菜单信息")
@GetMapping(value = "page/{pageNum}/{pageSize}")
public String findByPage(@PathVariable Integer pageNum,
@PathVariable Integer pageSize) {
return "OK";
}
}
|
第四步:创建配置属性类SwaggerProperties
1
2
3
4
5
6
7
8
9
10
11
12
13
14
15
16
17
18
19
20
21
22
23
24
25
26
27
28
29
30
31
32
33
34
35
36
37
38
39
40
41
42
43
44
45
46
47
48
49
50
51
52
53
54
55
| package cn.itcast.config;
import lombok.*;
import org.springframework.boot.context.properties.ConfigurationProperties;
import java.util.ArrayList;
import java.util.LinkedHashMap;
import java.util.List;
import java.util.Map;
@Data
@ConfigurationProperties(prefix = "pinda.swagger")
public class SwaggerProperties {
private String title = "在线文档";
private String group = "";
private String description = "在线文档";
private String version = "1.0";
private Contact contact = new Contact();
private String basePackage = "com.itheima.pinda";
private List<String> basePath = new ArrayList<>();
private List<String> excludePath = new ArrayList<>();
private Map<String, DocketInfo> docket = new LinkedHashMap<>();
public String getGroup() {
if (group == null || "".equals(group)) {
return title;
}
return group;
}
@Data
public static class DocketInfo {
private String title = "在线文档";
private String group = "";
private String description = "在线文档";
private String version = "1.0";
private Contact contact = new Contact();
private String basePackage = "";
private List<String> basePath = new ArrayList<>();
private List<String> excludePath = new ArrayList<>();
public String getGroup() {
if (group == null || "".equals(group)) {
return title;
}
return group;
}
}
@Data
public static class Contact {
private String name = "pinda";
private String url = "";
private String email = "";
}
}
|
第五步:创建application.yml文件
1
2
3
4
5
6
7
8
9
10
11
12
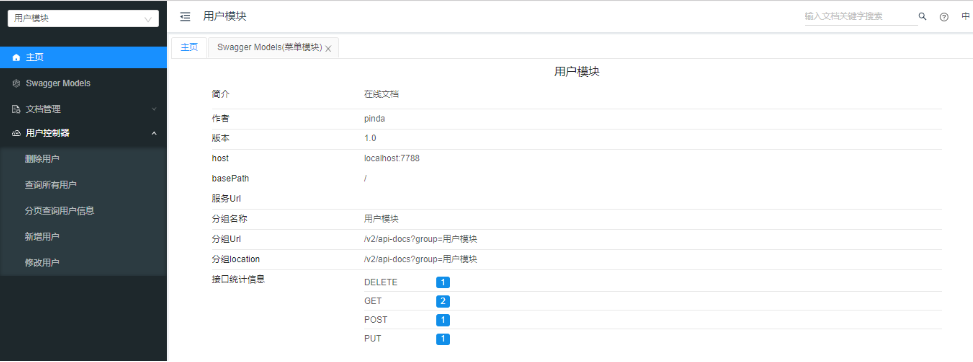
| server:
port: 7788
pinda:
swagger:
enabled: true
docket:
user:
title: 用户模块
base-package: cn.itcast.controller.user
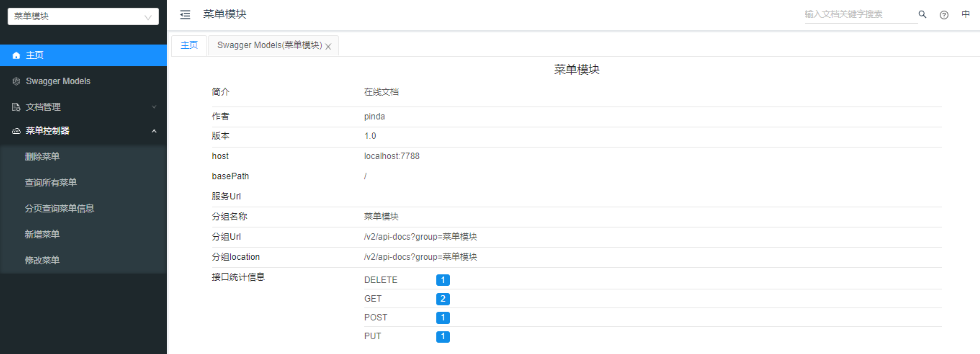
menu:
title: 菜单模块
base-package: cn.itcast.controller.menu
|
第六步:创建配置类SwaggerAutoConfiguration
1
2
3
4
5
6
7
8
9
10
11
12
13
14
15
16
17
18
19
20
21
22
23
24
25
26
27
28
29
30
31
32
33
34
35
36
37
38
39
40
41
42
43
44
45
46
47
48
49
50
51
52
53
54
55
56
57
58
59
60
61
62
63
64
65
66
67
68
69
70
71
72
73
74
75
76
77
78
79
80
81
82
83
84
85
86
87
88
89
90
91
92
93
94
95
96
97
98
99
100
101
102
103
104
105
106
107
108
109
110
111
112
113
114
115
116
117
118
119
120
121
122
123
124
125
126
127
128
129
130
131
132
133
134
135
136
137
138
139
140
141
142
143
144
145
146
147
148
| package cn.itcast.config;
import com.google.common.base.Predicate;
import com.google.common.base.Predicates;
import org.springframework.beans.BeansException;
import org.springframework.beans.factory.BeanFactory;
import org.springframework.beans.factory.BeanFactoryAware;
import org.springframework.beans.factory.annotation.Autowired;
import org.springframework.beans.factory.config.ConfigurableBeanFactory;
import org.springframework.boot.autoconfigure.condition.ConditionalOnMissingBean;
import org.springframework.boot.autoconfigure.condition.ConditionalOnProperty;
import org.springframework.boot.context.properties.EnableConfigurationProperties;
import org.springframework.context.annotation.Bean;
import org.springframework.context.annotation.Configuration;
import org.springframework.web.bind.annotation.RequestMethod;
import springfox.documentation.builders.ApiInfoBuilder;
import springfox.documentation.builders.PathSelectors;
import springfox.documentation.builders.RequestHandlerSelectors;
import springfox.documentation.service.ApiInfo;
import springfox.documentation.service.Contact;
import springfox.documentation.spi.DocumentationType;
import springfox.documentation.spring.web.plugins.Docket;
import springfox.documentation.swagger2.annotations.EnableSwagger2;
import java.util.ArrayList;
import java.util.LinkedList;
import java.util.List;
@Configuration
@ConditionalOnProperty(name = "pinda.swagger.enabled", havingValue = "true",
matchIfMissing = true)
@EnableSwagger2
@EnableConfigurationProperties(SwaggerProperties.class)
public class SwaggerAutoConfiguration implements BeanFactoryAware {
@Autowired
SwaggerProperties swaggerProperties;
private BeanFactory beanFactory;
@Bean
@ConditionalOnMissingBean
public List<Docket> createRestApi(){
ConfigurableBeanFactory configurableBeanFactory =
(ConfigurableBeanFactory) beanFactory;
List<Docket> docketList = new LinkedList<>();
if (swaggerProperties.getDocket().isEmpty()) {
Docket docket = createDocket(swaggerProperties);
configurableBeanFactory.registerSingleton(swaggerProperties.getTitle(),
docket);
docketList.add(docket);
return docketList;
}
for (String groupName : swaggerProperties.getDocket().keySet()){
SwaggerProperties.DocketInfo docketInfo =
swaggerProperties.getDocket().get(groupName);
ApiInfo apiInfo = new ApiInfoBuilder()
.title(docketInfo.getTitle())
.contact(new Contact(docketInfo.getContact().getName(),
docketInfo.getContact().getUrl(),
docketInfo.getContact().getEmail()))
.version(docketInfo.getVersion())
.description(docketInfo.getDescription())
.build();
if (docketInfo.getBasePath().isEmpty()) {
docketInfo.getBasePath().add("/**");
}
List<Predicate<String>> basePath = new ArrayList<>();
for (String path : docketInfo.getBasePath()) {
basePath.add(PathSelectors.ant(path));
}
List<Predicate<String>> excludePath = new ArrayList<>();
for (String path : docketInfo.getExcludePath()) {
excludePath.add(PathSelectors.ant(path));
}
Docket docket = new Docket(DocumentationType.SWAGGER_2)
.apiInfo(apiInfo)
.groupName(docketInfo.getGroup())
.select()
.apis(RequestHandlerSelectors.basePackage(docketInfo.getBasePackage()))
.paths(Predicates.and(Predicates.not(Predicates.or(excludePath)),Predicates.or(basePath)))
.build();
configurableBeanFactory.registerSingleton(groupName, docket);
docketList.add(docket);
}
return docketList;
}
private ApiInfo apiInfo(SwaggerProperties swaggerProperties) {
return new ApiInfoBuilder()
.title(swaggerProperties.getTitle())
.contact(new Contact(swaggerProperties.getContact().getName(),
swaggerProperties.getContact().getUrl(),
swaggerProperties.getContact().getEmail()))
.version(swaggerProperties.getVersion())
.description(swaggerProperties.getDescription())
.build();
}
private Docket createDocket(SwaggerProperties swaggerProperties) {
ApiInfo apiInfo = apiInfo(swaggerProperties);
if (swaggerProperties.getBasePath().isEmpty()) {
swaggerProperties.getBasePath().add("/**");
}
List<Predicate<String>> basePath = new ArrayList<>();
for (String path : swaggerProperties.getBasePath()) {
basePath.add(PathSelectors.ant(path));
}
List<Predicate<String>> excludePath = new ArrayList<>();
for (String path : swaggerProperties.getExcludePath()) {
excludePath.add(PathSelectors.ant(path));
}
return new Docket(DocumentationType.SWAGGER_2)
.apiInfo(apiInfo)
.groupName(swaggerProperties.getGroup())
.select()
.apis(RequestHandlerSelectors.basePackage(swaggerProperties.getBasePackage()))
.paths(Predicates.and(Predicates.not(Predicates.or(excludePath)),Predicates.or(basePath)))
.build();
}
@Override
public void setBeanFactory(BeanFactory beanFactory) throws BeansException {
this.beanFactory = beanFactory;
}
}
|
第七步:创建启动类SwaggerDemoApplication
1
2
3
4
5
6
7
8
9
10
11
| package cn.itcast;
import org.springframework.boot.SpringApplication;
import org.springframework.boot.autoconfigure.SpringBootApplication;
@SpringBootApplication
public class SwaggerDemoApplication {
public static void main(String[] args) {
SpringApplication.run(SwaggerDemoApplication.class, args);
}
}
|
执行启动类main方法启动项目,访问地址:http://localhost:7788/doc.html
如果接口文档不分组,我们可以修改application.yml文件:
1
2
3
4
5
6
7
| server:
port: 7788
pinda:
swagger:
enabled: true
title: test模块
base-package: cn.itcast.controller
|
再次访问地址:http://localhost:7788/doc.html
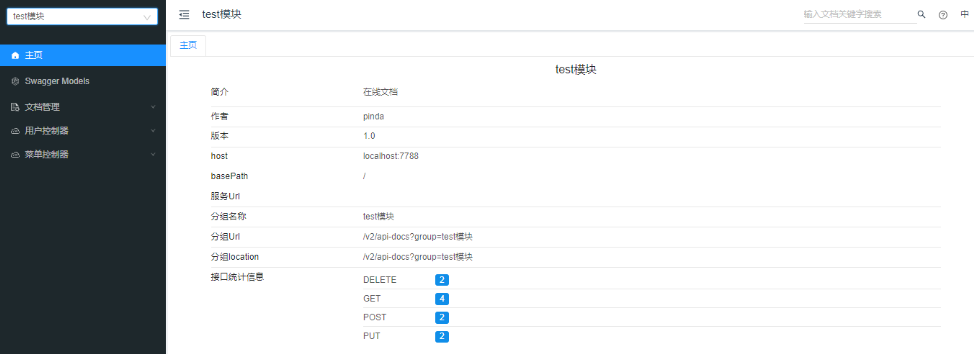
可以看到所有的接口在一个分组中。
通过上面的入门案例我们已经完成了接口文档的相关开发,而pd-tools-swagger2模块就是使用这种方式开发的,并且按照Spring boot starter的规范在/resources/META-INF中提供spring.factories文件,内容如下:
1
2
| org.springframework.boot.autoconfigure.EnableAutoConfiguration=\
com.itheima.pinda.swagger2.SwaggerAutoConfiguration
|
这样我们在其他模块中如果需要使用swagger接口文档功能,只需要引入这个starter并且在application.yml中进行swagger的相关配置即可,例如:
1
2
3
4
5
6
7
8
9
10
| pinda:
swagger:
enabled: true
docket:
user:
title: 用户模块
base-package: cn.itcast.controller.user
menu:
title: 菜单模块
base-package: cn.itcast.controller.menu
|
具体使用过程:
第一步:创建maven工程mySwaggerApp并配置pom.xml
1
2
3
4
5
6
7
8
9
10
11
12
13
14
15
16
17
18
19
20
21
22
23
24
25
26
27
| <?xml version="1.0" encoding="UTF-8"?>
<project xmlns="http://maven.apache.org/POM/4.0.0"
xmlns:xsi="http://www.w3.org/2001/XMLSchema-instance"
xsi:schemaLocation="http://maven.apache.org/POM/4.0.0 http://maven.apache.org/xsd/maven-4.0.0.xsd">
<modelVersion>4.0.0</modelVersion>
<parent>
<groupId>org.springframework.boot</groupId>
<artifactId>spring-boot-starter-parent</artifactId>
<version>2.2.2.RELEASE</version>
<relativePath/>
</parent>
<groupId>com.itheima</groupId>
<artifactId>mySwaggerApp</artifactId>
<version>1.0-SNAPSHOT</version>
<dependencies>
<dependency>
<groupId>com.itheima</groupId>
<artifactId>pd-tools-swagger2</artifactId>
<version>1.0-SNAPSHOT</version>
</dependency>
<dependency>
<groupId>org.projectlombok</groupId>
<artifactId>lombok</artifactId>
</dependency>
</dependencies>
</project>
|
第二步:创建User实体类
1
2
3
4
5
6
7
8
9
10
11
12
13
14
15
16
17
18
| package com.itheima.entity;
import io.swagger.annotations.ApiModel;
import io.swagger.annotations.ApiModelProperty;
import lombok.Data;
@Data
@ApiModel(description = "用户实体")
public class User {
@ApiModelProperty(value = "主键")
private int id;
@ApiModelProperty(value = "姓名")
private String name;
@ApiModelProperty(value = "年龄")
private int age;
@ApiModelProperty(value = "地址")
private String address;
}
|
第三步:创建UserController
1
2
3
4
5
6
7
8
9
10
11
12
13
14
15
16
17
18
19
20
21
22
23
24
25
26
27
28
29
30
31
32
33
34
35
36
37
38
39
40
41
42
43
44
45
46
47
48
49
50
51
52
53
54
55
56
57
58
59
| package com.itheima.controller;
import com.itheima.entity.User;
import io.swagger.annotations.Api;
import io.swagger.annotations.ApiImplicitParam;
import io.swagger.annotations.ApiImplicitParams;
import io.swagger.annotations.ApiOperation;
import org.springframework.web.bind.annotation.*;
import java.util.ArrayList;
import java.util.List;
@RestController
@RequestMapping("/user")
@Api(tags = "用户控制器")
public class UserController {
@GetMapping("/getUsers")
@ApiOperation(value = "查询所有用户", notes = "查询所有用户信息")
public List<User> getAllUsers(){
User user = new User();
user.setId(100);
user.setName("itcast");
user.setAge(20);
user.setAddress("bj");
List<User> list = new ArrayList<>();
list.add(user);
return list;
}
@PostMapping("/save")
@ApiOperation(value = "新增用户", notes = "新增用户信息")
public String save(@RequestBody User user){
return "OK";
}
@PutMapping("/update")
@ApiOperation(value = "修改用户", notes = "修改用户信息")
public String update(@RequestBody User user){
return "OK";
}
@DeleteMapping("/delete")
@ApiOperation(value = "删除用户", notes = "删除用户信息")
public String delete(int id){
return "OK";
}
@ApiImplicitParams({
@ApiImplicitParam(name = "pageNum", value = "页码",
required = true, type = "Integer"),
@ApiImplicitParam(name = "pageSize", value = "每页条数",
required = true, type = "Integer"),
})
@ApiOperation(value = "分页查询用户信息")
@GetMapping(value = "page/{pageNum}/{pageSize}")
public String findByPage(@PathVariable Integer pageNum,
@PathVariable Integer pageSize) {
return "OK";
}
}
|
第四步:创建application.yml
1
2
3
4
5
6
7
| server:
port: 8080
pinda:
swagger:
enabled: true
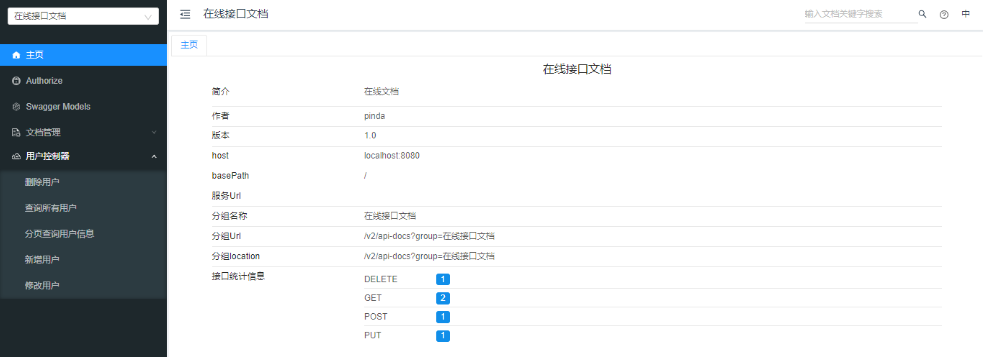
title: 在线接口文档
base-package: com.itheima.controller
|
第五步:创建启动类
1
2
3
4
5
6
7
8
9
10
11
| package com.itheima;
import org.springframework.boot.SpringApplication;
import org.springframework.boot.autoconfigure.SpringBootApplication;
@SpringBootApplication
public class MySwaggerApplication {
public static void main(String[] args) {
SpringApplication.run(MySwaggerApplication.class,args);
}
}
|
启动项目,访问地址:http://localhost:8080/doc.html

.jpg)