8.1 XSS介绍
XSS:跨站脚本攻击(Cross Site Scripting),为不和 CSS混淆,故将跨站脚本攻击缩写为XSS。XSS是指恶意攻击者往Web页面里插入恶意Script代码,当用户浏览该页时,嵌入其中Web里面的Script代码会被执行,从而达到恶意攻击用户的目的。有点类似于sql注入。
XSS攻击原理:
HTML是一种超文本标记语言,通过将一些字符特殊地对待来区别文本和标记,例如,小于符号(<)被看作是HTML标签的开始,<title>与</title>之间的字符是页面的标题等等。当动态页面中插入的内容含有这些特殊字符时,用户浏览器会将其误认为是插入了HTML标签,当这些HTML标签引入了一段JavaScript脚本时,这些脚本程序就将会在用户浏览器中执行。所以,当这些特殊字符不能被动态页面检查或检查出现失误时,就将会产生XSS漏洞。
8.2 AntiSamy介绍
AntiSamy是OWASP的一个开源项目,通过对用户输入的 HTML / CSS / JavaScript 等内容进行检验和清理,确保输入符合应用规范。AntiSamy被广泛应用于Web服务对存储型和反射型XSS的防御中。
AntiSamy的maven坐标:
1
2
3
4
5
6
7
8
9
10
11
|
<dependency>

  <groupId>org.owasp.antisamy</groupId>

  <artifactId>antisamy</artifactId>

  <version>1.5.7</version>

</dependency>
|
8.3 AntiSamy入门案例
第一步:创建maven工程antiSamy_demo并配置pom.xml文件
1
2
3
4
5
6
7
8
9
10
11
12
13
14
15
16
17
18
19
20
21
22
23
24
25
26
27
28
29
30
31
32
33
34
35
36
37
38
39
40
41
42
43
44
45
46
47
48
49
50
51
52
53
54
55
56
57
58
59
60
61
62
63
|
<?xml version="1.0" encoding="UTF-8"?>

<projectxmlns="http://maven.apache.org/POM/4.0.0"

         xmlns:xsi="http://www.w3.org/2001/XMLSchema-instance"

         xsi:schemaLocation="http://maven.apache.org/POM/4.0.0

                             http://maven.apache.org/xsd/maven-4.0.0.xsd">

    <modelVersion>4.0.0</modelVersion>

    <parent>

        <groupId>org.springframework.boot</groupId>

        <artifactId>spring-boot-starter-parent</artifactId>

        <version>2.2.2.RELEASE</version>

        <relativePath/>

    </parent>

    <groupId>cn.itcast</groupId>

    <artifactId>antiSamy_demo</artifactId>

    <version>1.0-SNAPSHOT</version>

    <dependencies>

        <dependency>

            <groupId>org.springframework.boot</groupId>

            <artifactId>spring-boot-starter-web</artifactId>

        </dependency>

        <dependency>

            <groupId>org.owasp.antisamy</groupId>

            <artifactId>antisamy</artifactId>

            <version>1.5.7</version>

        </dependency>

        <dependency>

            <groupId>org.projectlombok</groupId>

            <artifactId>lombok</artifactId>

        </dependency>

    </dependencies>

</project>
|
第二步:创建application.yml
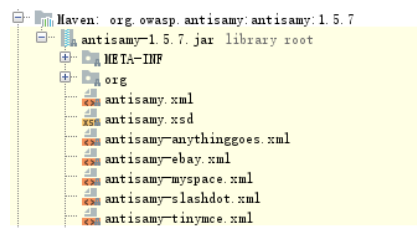
第三步:创建策略文件/resources/antisamy-test.xml,文件内容可以从antisamy的jar包中获取
注:AntiSamy对“恶意代码”的过滤依赖于策略文件。策略文件规定了AntiSamy对各个标签、属性的处理方法,策略文件定义的严格与否,决定了AntiSamy对XSS漏洞的防御效果。在AntiSamy的jar包中,包含了几个常用的策略文件,直接到antiSamy提供的jar包中随便复制一个xml文件到resources下就行了,一般选择antisamy-ebay.xml。不同xml的区别就是他们对各个标签、属性的处理策略不一样而已。
第四步:创建User实体类
1
2
3
4
5
6
7
8
9
10
11
12
13
14
15
16
17
18
19
|
package cn.itcast.entity;
import lombok.Data;
@Data
publicclassUser {
privateintid;
privateStringname;
privateintage;
}
|
第五步:创建UserController
1
2
3
4
5
6
7
8
9
10
11
12
13
14
15
16
17
18
19
20
21
22
23
24
25
26
27
28
29
|
package cn.itcast.controller;
import cn.itcast.entity.User;
import org.springframework.web.bind.annotation.RequestMapping;
import org.springframework.web.bind.annotation.RestController;
@RestController
@RequestMapping("/user")
publicclassUserController {
@RequestMapping("/save")
publicStringsave(Useruser){
System.out.println("UserController save.... " + user);
returnuser.getName();
}
}
|
第六步:创建/resources/static/index.html页面
1
2
3
4
5
6
7
8
9
10
11
12
13
14
15
16
17
18
19
20
21
22
23
24
25
26
27
28
29
30
31
|
<!DOCTYPEhtml>
<htmllang="en">
<head>
<metacharset="UTF-8">
<title>Title</title>
</head>
<body>
<formmethod="post"action="/user/save">
id:<inputtype="text"name="id"><br>
name:<inputtype="text"name="name"><br>
age:<inputtype="text"name="age"><br>
<inputtype="submit"value="submit">
</form>
</body>
</html>
|
第七步:创建启动类
1
2
3
4
5
6
7
8
9
10
11
12
13
14
15
16
17
18
19
20
21
|
package cn.itcast;
import org.springframework.boot.SpringApplication;
import org.springframework.boot.autoconfigure.SpringBootApplication;
@SpringBootApplication
publicclassAntiSamyApp {
publicstaticvoidmain(String[] args) {
SpringApplication.run(AntiSamyApp.class,args);
}
}
|
此时我们可以启动项目进行访问,但是还没有进行参数的过滤,所以如果我们输入任意参数都可以正常传递到Controller中,这在实际项目中是非常不安全的。为了对我们输入的数据进行过滤清理,需要通过过滤器来实现。
第八步:创建过滤器,用于过滤所有提交到服务器的请求参数
1
2
3
4
5
6
7
8
9
10
11
12
13
14
15
16
17
18
19
20
21
22
23
24
25
26
27
28
29
30
31
32
33
34
35
36
37
|
package cn.itcast.filter;
import cn.itcast.wrapper.XssRequestWrapper;
import javax.servlet.*;
import javax.servlet.http.HttpServletRequest;
import java.io.IOException;
publicclassXssFilterimplementsFilter{
@Override
publicvoiddoFilter(ServletRequestservletRequest, ServletResponseservletResponse,
FilterChainfilterChain) throwsIOException, ServletException {
HttpServletRequestrequest = (HttpServletRequest)servletRequest;
filterChain.doFilter(newXssRequestWrapper(request),servletResponse);
}
}
|
注意:通过上面的过滤器可以发现我们并没有在过滤器中直接进行请求参数的过滤清理,而是直接放行了,那么我们还怎么进行请求参数的过滤清理呢?其实过滤清理的工作是在另外一个类XssRequestWrapper中进行的,当上面的过滤器放行时需要调用filterChain.doFilter()方法,此方法需要传入请求Request对象,此时我们可以将当前的request对象进行包装,而XssRequestWrapper就是Request对象的包装类,在过滤器放行时会自动调用包装类的getParameterValues方法,我们可以在包装类的getParameterValues方法中进行统一的请求参数过滤清理。
第九步:创建XssRequestWrapper类
1
2
3
4
5
6
7
8
9
10
11
12
13
14
15
16
17
18
19
20
21
22
23
24
25
26
27
28
29
30
31
32
33
34
35
36
37
38
39
40
41
42
43
44
45
46
47
48
49
50
51
52
53
54
55
56
57
58
59
60
61
62
63
64
65
66
67
68
69
70
71
72
73
74
75
76
77
78
79
80
81
82
83
84
85
86
87
88
89
90
91
92
93
94
95
96
97
98
99
100
101
102
103
104
105
106
107
108
109
110
111
112
113
114
115
116
117
118
119
120
121
|
package cn.itcast.wrapper;
import org.owasp.validator.html.*;
import javax.servlet.http.HttpServletRequest;
import javax.servlet.http.HttpServletRequestWrapper;
publicclassXssRequestWrapperextendsHttpServletRequestWrapper {
privatestaticStringantiSamyPath = XssRequestWrapper.class.getClassLoader()
.getResource( "antisamy-test.xml").getFile();
publicstatic Policypolicy = null;
static {
try {
policy = Policy.getInstance(antiSamyPath);
} catch (PolicyExceptione) {
e.printStackTrace();
}
}
privateStringxssClean( StringtaintedHTML){
try{
AntiSamyantiSamy = newAntiSamy();
CleanResultscr = antiSamy.scan( taintedHTML, policy);
taintedHTML = cr.getCleanHTML();
}catch( ScanExceptione) {
e.printStackTrace();
}catch( PolicyExceptione) {
e.printStackTrace();
}
return taintedHTML;
}
publicXssRequestWrapper(HttpServletRequestrequest) {
super(request);
}
@Override
publicString[] getParameterValues(Stringname){
String[] values = super.getParameterValues(name);
if ( values == null){
returnnull;
}
intlen = values.length;
String[] newArray = newString[len];
for (intj = 0; j < len; j++){
System.out.println("Antisamy过滤清理,清理之前的参数值:" + values[j]);
newArray[j] = xssClean(values[j]);
System.out.println("Antisamy过滤清理,清理之后的参数值:" + newArray[j]);
}
return newArray;
}
}
|
第十步:为了使上面定义的过滤器生效,需要创建配置类,用于初始化过滤器对象
1
2
3
4
5
6
7
8
9
10
11
12
13
14
15
16
17
18
19
20
21
22
23
24
25
26
27
28
29
30
31
32
33
34
35
36
37
38
39
40
41
42
|
package cn.itcast.config;
import cn.itcast.filter.XssFilter;
import org.springframework.boot.web.servlet.FilterRegistrationBean;
import org.springframework.context.annotation.Bean;
import org.springframework.context.annotation.Configuration;
@Configuration
publicclassAntiSamyConfiguration {
@Bean
publicFilterRegistrationBeanfilterRegistrationBean() {
FilterRegistrationBeanfilterRegistration =
newFilterRegistrationBean(newXssFilter());
filterRegistration.addUrlPatterns("/*");
filterRegistration.setOrder(1);
return filterRegistration;
}
}
|
启动项目,页面输入非法数据,可以看到非法数据被清理掉了。
注意:当前我们在进行请求参数过滤时只是在包装类的getParameterValues方法中进行了处理,真实项目中可能用户提交的数据在请求头中,也可能用户提交的是json数据,所以如果考虑所有情况,我们可以在包装类中的多个方法中都进行清理处理即可,如下:
1
2
3
4
5
6
7
8
9
10
11
12
13
14
15
16
17
18
19
20
21
22
23
24
25
26
27
28
29
30
31
32
33
34
35
36
37
38
39
40
41
42
43
44
45
46
47
48
49
50
51
52
53
54
55
56
57
58
59
60
61
62
63
64
65
66
67
68
69
70
71
72
73
74
75
76
77
78
79
80
81
82
83
84
85
86
87
88
89
90
91
92
93
94
95
96
97
98
99
100
101
102
103
104
105
106
107
108
109
110
111
112
113
114
115
116
117
118
119
120
121
122
123
124
125
126
127
128
129
130
131
132
133
134
135
136
137
138
139
140
141
142
143
144
145
146
147
148
149
150
151
152
153
154
155
156
157
158
159
160
161
162
163
164
165
166
167
168
169
170
171
172
173
174
175
176
|
package cn.itcast.wrapper;
import org.owasp.validator.html.*;
import javax.servlet.http.HttpServletRequest;
import javax.servlet.http.HttpServletRequestWrapper;
import java.util.Map;
publicclassXssRequestWrapperextendsHttpServletRequestWrapper {
privatestaticStringantiSamyPath = XssRequestWrapper.class.getClassLoader()
.getResource( "antisamy-ebay.xml").getFile();
publicstatic Policypolicy = null;
static {
try {
policy = Policy.getInstance(antiSamyPath);
} catch (PolicyExceptione) {
e.printStackTrace();
}
}
privateStringxssClean( StringtaintedHTML){
try{
AntiSamyantiSamy = newAntiSamy();
CleanResultscr = antiSamy.scan( taintedHTML, policy);
taintedHTML = cr.getCleanHTML();
}catch( ScanExceptione) {
e.printStackTrace();
}catch( PolicyExceptione) {
e.printStackTrace();
}
return taintedHTML;
}
publicXssRequestWrapper(HttpServletRequestrequest) {
super(request);
}
@Override
publicString[] getParameterValues(Stringname){
String[] values = super.getParameterValues(name);
if ( values == null){
returnnull;
}
intlen = values.length;
String[] newArray = newString[len];
for (intj = 0; j < len; j++){
newArray[j] = xssClean(values[j]);
}
return newArray;
}
@Override
publicStringgetParameter(StringparamString) {
Stringstr = super.getParameter(paramString);
if (str == null) {
returnnull;
}
returnxssClean(str);
}
@Override
publicStringgetHeader(StringparamString) {
Stringstr = super.getHeader(paramString);
if (str == null) {
returnnull;
}
returnxssClean(str);
}
@Override
publicMap<String, String[]> getParameterMap() {
Map<String, String[]> requestMap = super.getParameterMap();
for (Map.Entry<String, String[]> me:requestMap.entrySet()) {
String[] values = me.getValue();
for (inti = 0; i < values.length; i++) {
values[i] = xssClean(values[i]);
}
}
return requestMap;
}
}
|
pd-tools-xss的实现和我们上面的入门案例是一致的,底层也是基于AntiSamy对输入参数进行检验和清理,确保输入符合应用规范。
为了方便使用,pd-tools-xss已经定义为了starter,其他应用只需要导入其maven坐标,不需要额外进行任何配置就可以使用。
具体使用过程:
第一步:创建maven工程并配置pom.xml文件
1
2
3
4
5
6
7
8
9
10
11
12
13
14
15
16
17
18
19
20
21
22
23
24
25
26
27
28
29
30
31
32
33
34
35
36
37
38
39
40
41
42
43
44
45
46
47
48
49
50
51
52
53
54
55
|
<?xml version="1.0" encoding="UTF-8"?>

<projectxmlns="http://maven.apache.org/POM/4.0.0"

         xmlns:xsi="http://www.w3.org/2001/XMLSchema-instance"

         xsi:schemaLocation="http://maven.apache.org/POM/4.0.0

                             http://maven.apache.org/xsd/maven-4.0.0.xsd">

    <modelVersion>4.0.0</modelVersion>

    <parent>

        <groupId>org.springframework.boot</groupId>

        <artifactId>spring-boot-starter-parent</artifactId>

        <version>2.2.2.RELEASE</version>

        <relativePath/>

    </parent>

    <groupId>com.itheima</groupId>

    <artifactId>myXssApp</artifactId>

    <version>1.0-SNAPSHOT</version>

    <dependencies>

        <dependency>

            <groupId>com.itheima</groupId>

            <artifactId>pd-tools-xss</artifactId>

            <version>1.0-SNAPSHOT</version>

        </dependency>

        <dependency>

            <groupId>org.springframework.boot</groupId>

            <artifactId>spring-boot-starter-web</artifactId>

        </dependency>

    </dependencies>

</project>
|
第二步:创建XSSController
1
2
3
4
5
6
7
8
9
10
11
12
13
14
15
16
17
18
19
20
21
22
23
24
25
26
27
|
package com.itheima.controller;


import org.springframework.web.bind.annotation.GetMapping;

import org.springframework.web.bind.annotation.RequestMapping;

import org.springframework.web.bind.annotation.RestController;


@RestController

@RequestMapping("/xss")

publicclassXSSController {

    @GetMapping("/get")

    publicStringget(Stringtext){

        return"处理之后的文本内容为:" + text;

    }

}
|
第三步:创建启动类
1
2
3
4
5
6
7
8
9
10
11
12
13
14
15
16
17
18
19
20
21
|
package com.itheima;


import org.springframework.boot.SpringApplication;

import org.springframework.boot.autoconfigure.SpringBootApplication;


@SpringBootApplication

publicclassXssApplication {

    publicstaticvoidmain(String[] args) {

        SpringApplication.run(XssApplication.class,args);

    }

}
|
启动项目,访问如下地址:
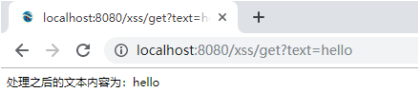
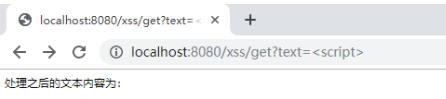
可以看到,如果输入的是普通文本则不做任何处理。如果输入的是特殊标签则被清理掉了。

.jpg)